Curbside Upcycled Chair
I visited my neighbors garage sale and saw this chair that had, it had a ugly lepoard print on it but i didn't really want to spend the 5 bucks they were asking for. Ya being cheap that day! So a few days later it was garbage day and everything that didn't sell they through down by the curb for the garbage man. I was waiting at the bus stop pondering if i should go snatch that. I had the other mom at the bus stop watch henry while i hauled it home. It sat in my garage for a few weeks because i didn't have extra money to put into in and i wanted to think about how i wanted it to look in the end.


Yesterday I had a long day of watching the kids so when scott got home i said I'm going to the fabric store to just look. Well that was the plan but i found a piece of remnant upholstery fabric and i couldn't pass it up. It was neutral and fun. i bought 2 1/2 yards because i didn't measure my chair so i figured i get a extra half yard just in case. Everyone at the store was like so cute oh that is adorable fabric. It's not like i designed it people i just have fabulous taste! *wink wink* I did end up talking to a lady about upcycling stuff i find on the side of the road and she does the same and it was refreshing to talk finds with someone. God must have known i need that today and that is why i was there!

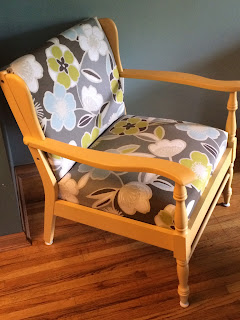
I wanted my wood frame to be Yellow something cheery and i happened to have 2 yellow choices left over from a dresser i did last year. Thank you paint stash! So i got my sander out and sanded it down a bit, gave the whole chair a coat of primer and then painted it yellow.


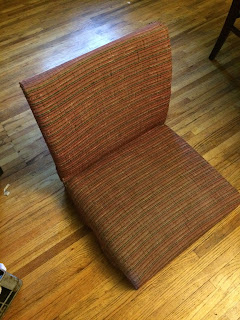
The seat part came all out with a few removal of screws and that made reupholstering a breeze. I removed the leopard print and then found a weird red fabric print. I left the red on because there was no need to remove it. I had to go borrow the neighbors plug in stapler because we don't have one. Seriously why not? She also sent me home with a foam cushion that i was going to use but it just was to big and made the chair look silly. I started with cutting the fabric to fit the top and back section and then a piece for the bottom section. I was able to bring the fabric through the middle bottom part and staple underneath which helped give it a super smooth look so i didn't get bunching. Then i did the top and back section. And then i cut the extra fabric i had along the side of the chair and folded it in to get a nice seam and stapled it. The chair covers the side staples so it worked out nicely.


I started working on this project about 6pm but had to do many stops along the way like kids needing something, needing to run and get staples, and bedtimes. I might have kept the kids up a bit with my stapling but eventually they fell asleep to the sound of it! :) I was all done by 9pm


It's in my living room but I'm not sure if it's going to stay where i put it right now. I am so glad i did this project i have been craving a diy project that involves paint and a sander.
The total project cost
- Chair= free
- Fabric= $13.00 but had a half yard of extra material left so $10.00
- Sand paper= Free
- Primer=$3.00
- Paint= Free
- Staples=$3.56 but have a good 3/4 of the box left
So i would say it cost me about $14.00 on a free chair that looks awesome if i do say so myself. This makes me want to search craigslist for more projects to do!

Comments
Post a Comment