Bathroom Demo Part 1
We have lived in our house for 10 1/2 years now and the bathroom was the one room that was not given a face lift when we bought it. We financially couldn't afford to fix it up till now or I also think we were intimidated on tackling it. We decided this year we were not going to go on a big vacation we needed to put some money back in our house and fix up the stuff on our list. Things are looking a little rough around here!
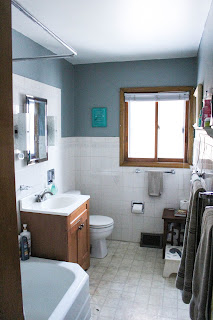
This is our bathroom in it's current state before we started anything!


So I began going on Pinterest looking for ideas on what I wanted the bathroom to look like and pricing out material online from the the building material stores. Let me tell ya that was a chore.... I wanted to stay on a $1500.00 budget so that meant we were not going to change the foot print of the bathroom. If we had a huge budget we would change the layout, which means we would break up the floor to change the plumbing around and add a big jacuzzi tub. But it didn't feel it would add value to the house and be worth the cost. I wanted this bathroom to be bright and crisp. I like farmhouse style because it has a warmth to it but I also love industrial with all the metals and that gives it good textures. So I combined them. We ordered our bathtub because it was going to take a few weeks to get in, and we also picked out our vanity/sink because it was on sale. But the rest of the items we were still picking and were going to decide as we went along.
We didn't have a date set for demo, but the tub was about to arrive this week and I got antsy and texted scott "hey can I demo the bathroom?" And I thought for sure he would be like NO!! Instead he says sure go for it. I was like Sweet! So with no real plan, except that I knew the wall of tile had to come down so that is where I started. We had so much tile in this bathroom. I scored above the tile with a razor blade so it wouldn't rip the sheet rock above and then I got my crow bar and hammer and began chipping away. First layer tile, second layer plastic tile things, 3rd layer paneling, 4th layer sheetrock. Dang!!! About a hour in Bella thought it looked like fun so she joined me too.


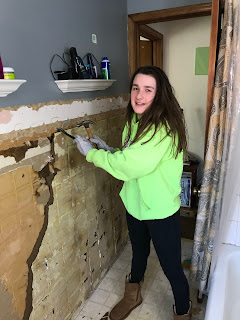


All the kids were home for a few days because of conferences at school, so that made it more challenging. But it worked out! By the time Scott got home from work I had the long wall demolished to the studs, and was half way done with the exterior wall. We took the rest of the walls down to the studs except for the shower surround area. We couldn't do anything till the tub arrived, and we still needed to use it. Did I mention we have one bathroom for the 5 of us! Demo has to be quick.


We only found a few things hidden in the wall.... one small dead mouse, and behind the sink the wall was filled with razor blades. I was like what drug dealer lived here??? but we have a built in medicine cabinet and there is a slot in the back where you throw your old razors after you use them for safety reasons. Weird! But that's not to bad for suprises!


So the next day we ripped out the 4 layer of linoleum flooring. Yes you heard correct. They slapped a new layer on every 10 years. We got it down to the concrete. That was a fun workout!


We picked up some vinyl floor adhesive to apply to the concrete so the new floor would stick to it better. We went with a vinyl peel and stick panel floor. It has a grey wood barn look. We picked that up at lowes.
While we were at lowes we picked up the sheet rock to put up on the walls where the tile used to be.
So now at this point the walls are back up and taped, mudded, and sanded. We removed our old sink vanity, took the toilet out for the day, we kept the toilet because we just bought not to long ago. Then we laid the new floors. That flooring was so quick and easy to apply.


The kids were not happy they couldn't use the bathroom, there might have been tons of whining about this and why did we do this to the bathroom and so on. I kept telling them its temporary!
Next up was another trip to get a light fixture. I went on to Home Depot site and found one I liked but there website is confusing sometimes because when I arrived to the store I didn't see it. It turns out it was a online only item. So I looked at menards, and lowes for options and lowes had a cute one in the style I was looking for. So I picked that up while scott was framing a spot for our old medicine cabinet back in the wall. We wanted the storage but didn't like the look of how they stick out of the wall. Our vanity came with a mirror so we decided to take the mirror and put a hinge on it and connect it to the old medicine cabinet. It's flush with the wall and you would never know there was storage behind that mirror. Well I guess you know now!
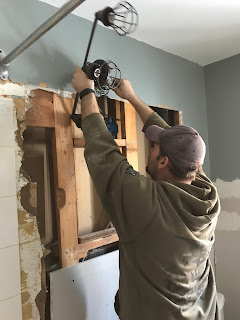
We had to do one thing that we really are clueless on and that is electrical. The old bathroom had two sconces on each side of the mirror but we changed it to go above the mirror now because the mirror is a lot larger then the previous one. So he had to wire it up, and he only got shocked twice because he refused to turn the power off. Lets just say I told him so! Well he ended up pulling it off and it looks fantastic!


The vanity will have to come back out once we do the shower but we will need a semi working bathroom for the week till the shower comes.

So during the week we picked up 1/4 inch underlayment sheets to work on the shiplap wall. I found this way of making your wall look like shiplap without paying the high price of shiplap materials. So we took the sheet of underlayment and cut it the long way 6 inches strips. I then painted the edges of all the strips of plywood so it would be easier when I go to paint the wall I dont have to get in all the cracks. We were going to staggered how we applied the plywood to the wall so we would get a seam in the same spot. We started at the top of the ceiling so if there was a gap the baseboard would hide it. The walls are not straight our house is built in 1955. We used a brad nailer and attached the first row and used a paint stir stick as the guide for the spacing between the next row. After we attached all the boards on the wall I wood putted the holes and seams. Then painted it a pretty white. That totally transformed the bathroom.


 I forgot to take a pic of it finished all the way to the floor.
I also finally picked a wall color for the rest of the walls. It took me awhile.


This is our bathroom in it's current state before we started anything!


the tile that surrounds our entire bathroom

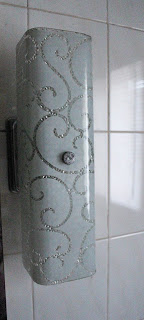
our vanity wall sconces

the floors are rolling up on the sides and holes in the floor
Yep that's not pretty!
We didn't have a date set for demo, but the tub was about to arrive this week and I got antsy and texted scott "hey can I demo the bathroom?" And I thought for sure he would be like NO!! Instead he says sure go for it. I was like Sweet! So with no real plan, except that I knew the wall of tile had to come down so that is where I started. We had so much tile in this bathroom. I scored above the tile with a razor blade so it wouldn't rip the sheet rock above and then I got my crow bar and hammer and began chipping away. First layer tile, second layer plastic tile things, 3rd layer paneling, 4th layer sheetrock. Dang!!! About a hour in Bella thought it looked like fun so she joined me too.


All the kids were home for a few days because of conferences at school, so that made it more challenging. But it worked out! By the time Scott got home from work I had the long wall demolished to the studs, and was half way done with the exterior wall. We took the rest of the walls down to the studs except for the shower surround area. We couldn't do anything till the tub arrived, and we still needed to use it. Did I mention we have one bathroom for the 5 of us! Demo has to be quick.


We only found a few things hidden in the wall.... one small dead mouse, and behind the sink the wall was filled with razor blades. I was like what drug dealer lived here??? but we have a built in medicine cabinet and there is a slot in the back where you throw your old razors after you use them for safety reasons. Weird! But that's not to bad for suprises!


So the next day we ripped out the 4 layer of linoleum flooring. Yes you heard correct. They slapped a new layer on every 10 years. We got it down to the concrete. That was a fun workout!


We picked up some vinyl floor adhesive to apply to the concrete so the new floor would stick to it better. We went with a vinyl peel and stick panel floor. It has a grey wood barn look. We picked that up at lowes.
While we were at lowes we picked up the sheet rock to put up on the walls where the tile used to be.
So now at this point the walls are back up and taped, mudded, and sanded. We removed our old sink vanity, took the toilet out for the day, we kept the toilet because we just bought not to long ago. Then we laid the new floors. That flooring was so quick and easy to apply.


Next up was another trip to get a light fixture. I went on to Home Depot site and found one I liked but there website is confusing sometimes because when I arrived to the store I didn't see it. It turns out it was a online only item. So I looked at menards, and lowes for options and lowes had a cute one in the style I was looking for. So I picked that up while scott was framing a spot for our old medicine cabinet back in the wall. We wanted the storage but didn't like the look of how they stick out of the wall. Our vanity came with a mirror so we decided to take the mirror and put a hinge on it and connect it to the old medicine cabinet. It's flush with the wall and you would never know there was storage behind that mirror. Well I guess you know now!
We had to do one thing that we really are clueless on and that is electrical. The old bathroom had two sconces on each side of the mirror but we changed it to go above the mirror now because the mirror is a lot larger then the previous one. So he had to wire it up, and he only got shocked twice because he refused to turn the power off. Lets just say I told him so! Well he ended up pulling it off and it looks fantastic!


The vanity will have to come back out once we do the shower but we will need a semi working bathroom for the week till the shower comes.

So during the week we picked up 1/4 inch underlayment sheets to work on the shiplap wall. I found this way of making your wall look like shiplap without paying the high price of shiplap materials. So we took the sheet of underlayment and cut it the long way 6 inches strips. I then painted the edges of all the strips of plywood so it would be easier when I go to paint the wall I dont have to get in all the cracks. We were going to staggered how we applied the plywood to the wall so we would get a seam in the same spot. We started at the top of the ceiling so if there was a gap the baseboard would hide it. The walls are not straight our house is built in 1955. We used a brad nailer and attached the first row and used a paint stir stick as the guide for the spacing between the next row. After we attached all the boards on the wall I wood putted the holes and seams. Then painted it a pretty white. That totally transformed the bathroom.


I also finally picked a wall color for the rest of the walls. It took me awhile.

top choices

finally decision
a few more days till the tub arrives before we can finish the second part of this bathroom demo. This place is really starting to look like my vision. exciting!

Comments
Post a Comment